Stunning And Easy Drawing Of A Rose: A Beginner's Guide
Let’s face it, drawing a rose might sound intimidating at first, but it doesn’t have to be. If you’re looking for a stunning and easy way to create a beautiful rose drawing, you’re in the right place. This guide is crafted specifically for beginners like you who want to dive into the world of art without feeling overwhelmed. Whether you’re picking up a pencil for the first time or trying to improve your skills, we’ve got you covered!
Art doesn’t have to be complicated. It’s about expressing yourself, and roses are one of the most iconic symbols of beauty and love. Learning how to draw a rose not only enhances your artistic abilities but also gives you a sense of accomplishment. Who wouldn’t want to create something breathtakingly beautiful?
In this guide, we’ll walk you through the process step by step, making it as simple as possible. From basic shapes to adding intricate details, we’ll ensure that by the end of this article, you’ll have a stunning rose drawing to show off. So, let’s get started!
- Hd Hub 4 Uearth Your Ultimate Destination For Highquality Media And Beyond
- Unleash Your Inner Movie Buff Tamil Movie Download Website You Need To Know
Table of Contents
- Why Drawing a Rose Is So Appealing
- Tools You’ll Need to Get Started
- Breaking Down the Rose: Starting with Basic Shapes
- Step-by-Step Guide to Drawing a Stunning Rose
- Adding Details to Make Your Rose Pop
- Shading Techniques to Add Depth
- Common Mistakes Beginners Make and How to Avoid Them
- Finding Inspiration for Your Rose Art
- Practice Tips to Improve Your Skills
- Wrapping It Up: Your Stunning Rose Drawing Journey
Why Drawing a Rose Is So Appealing
Drawing a rose is like creating a masterpiece with your own hands. Roses have been symbols of beauty, love, and passion for centuries, and their intricate structure makes them a fascinating subject for artists. But don’t let their complexity scare you! Once you break it down into manageable steps, drawing a rose becomes not just easy but also incredibly satisfying.
Plus, there’s something magical about watching a blank piece of paper transform into a stunning rose. It’s like giving life to your imagination. And hey, who wouldn’t want to impress their friends and family with a breathtaking drawing?
Why Roses Stand Out in Art
Roses have an undeniable charm that captures the essence of art. They’re versatile, meaning you can experiment with different styles, colors, and techniques. Whether you’re into realism, minimalism, or even abstract art, roses provide endless opportunities for creativity.
- Movie Rulez 5 The Ultimate Guide To Your Movie Streaming Adventure
- Movie Rules The Ultimate Guide To Navigating The Film World
Tools You’ll Need to Get Started
Before we dive into the drawing process, let’s talk about the tools you’ll need. Don’t worry; you don’t have to invest in expensive supplies. Here’s a quick list of essentials:
- Pencils (HB, 2B, 4B)
- Eraser (kneaded and regular)
- Sketchbook or drawing paper
- Blending tools (optional)
These basic tools will help you create a stunning rose drawing without breaking the bank. And as you progress, you can always explore more advanced materials.
Breaking Down the Rose: Starting with Basic Shapes
One of the easiest ways to approach drawing a rose is by breaking it down into simple shapes. This method makes the process less intimidating and more manageable. Here’s how you can start:
Begin with a small circle for the center of the rose. Then, add petals around it using oval shapes. Gradually build up the layers, making each petal slightly larger than the one before. This technique helps create the illusion of a realistic rose.
Understanding the Structure of a Rose
Roses have a unique structure that consists of multiple layers of petals. By focusing on the basic shapes first, you can ensure that your drawing has the right proportions. It’s all about creating depth and dimension, which we’ll explore further in the shading section.
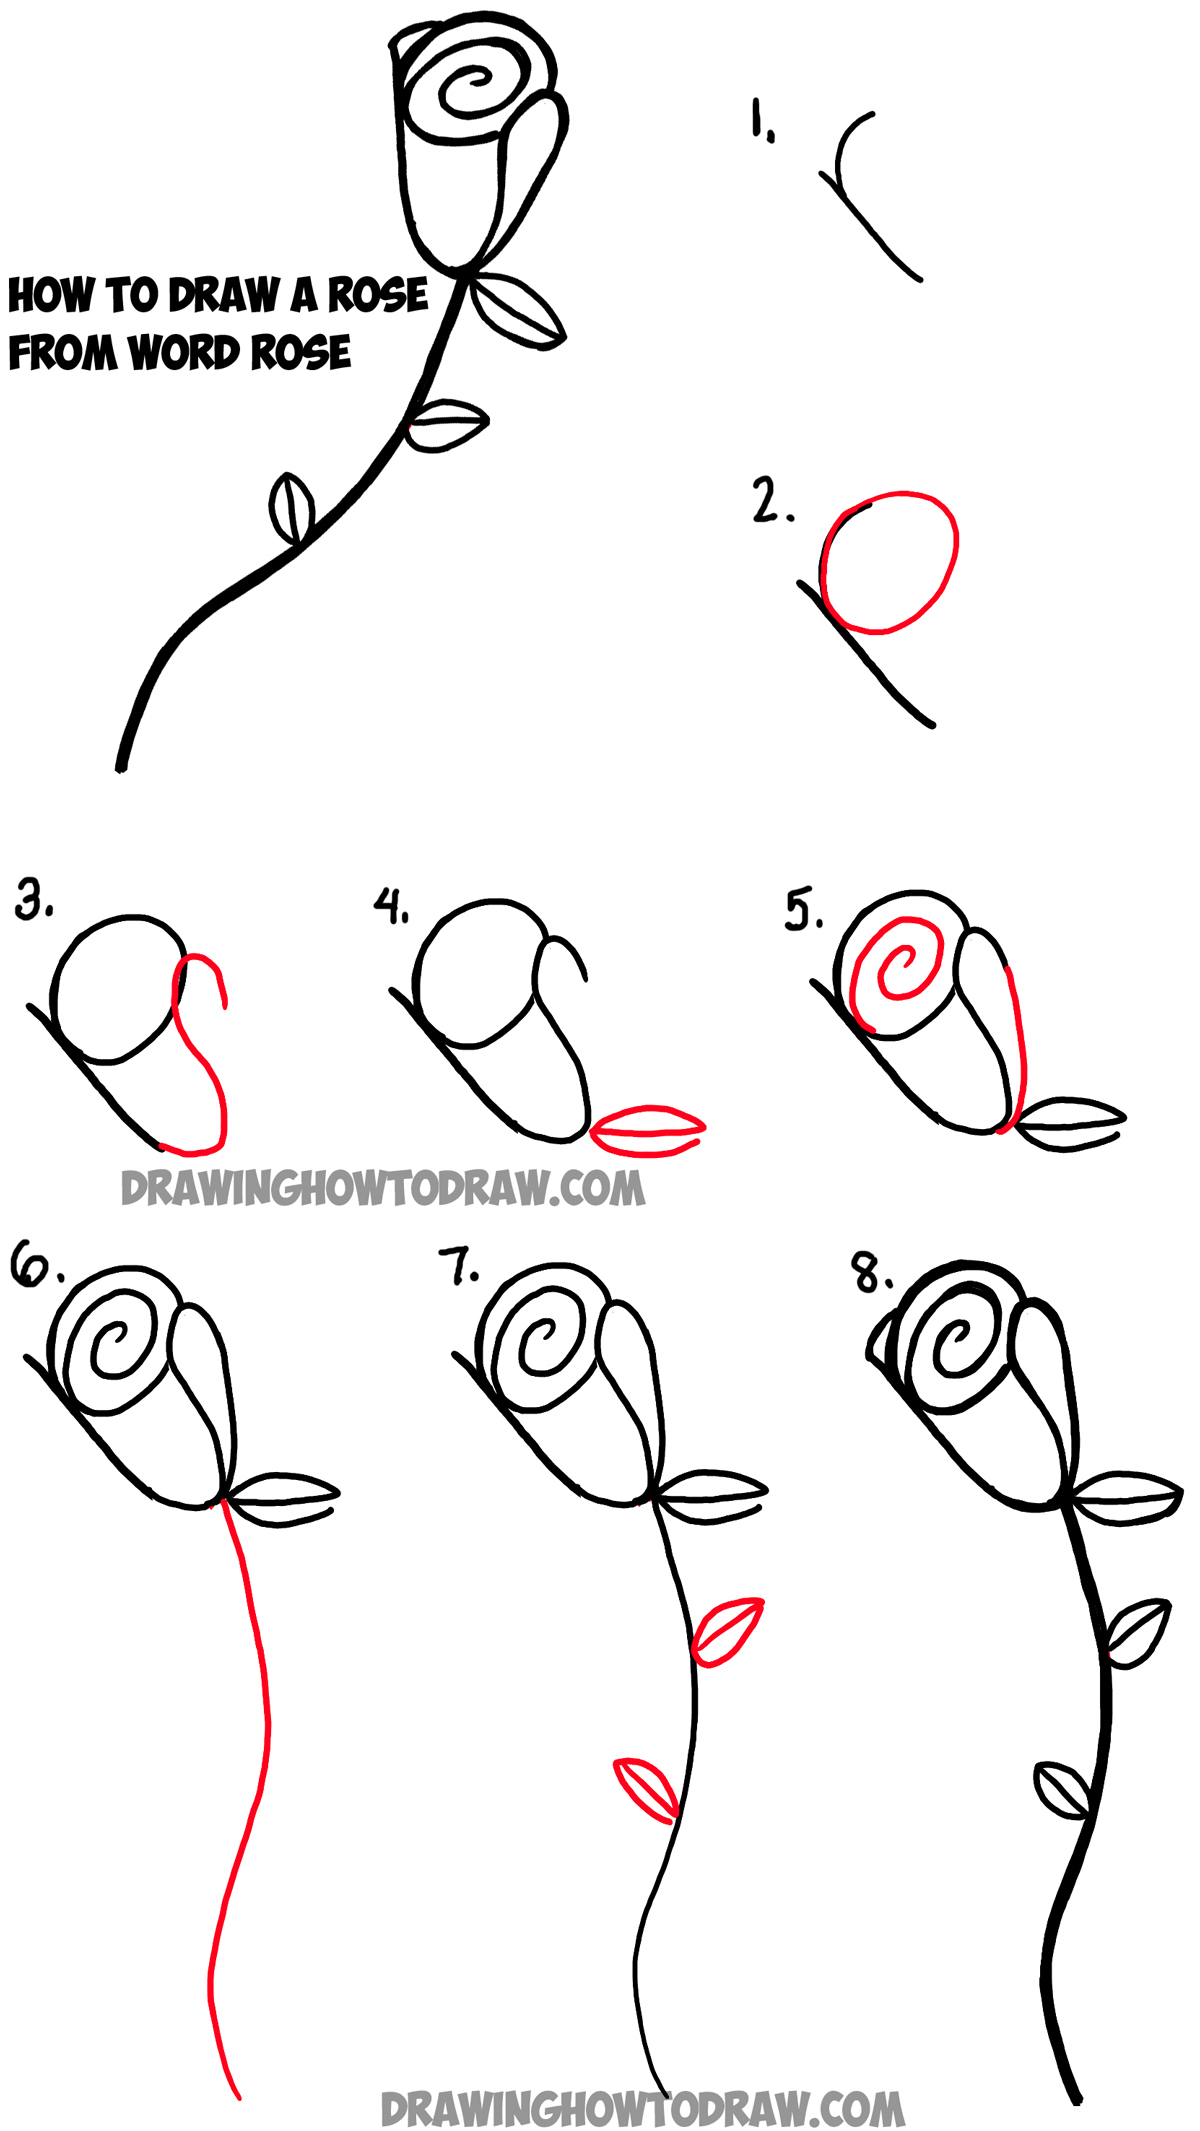
Step-by-Step Guide to Drawing a Stunning Rose
Now that you have the basics down, let’s move on to the step-by-step process of drawing a stunning rose. Follow these steps carefully, and you’ll be amazed at the results:
Step 1: Start with a small circle for the center of the rose.
Step 2: Add a few oval shapes around the circle to form the inner petals.
Step 3: Gradually add more petals, making them slightly larger as you move outward.
Step 4: Sketch the stem and leaves using simple lines.
Step 5: Refine your sketch by erasing unnecessary guidelines.
By following these steps, you’ll create a solid foundation for your rose drawing. Remember, practice makes perfect!
Pro Tips for a Stunning Rose
Here are a few pro tips to take your rose drawing to the next level:
- Observe real roses to understand their structure better.
- Experiment with different pencil strokes to add texture.
- Don’t be afraid to make mistakes; they’re part of the learning process.
Adding Details to Make Your Rose Pop
Once you’ve completed the basic structure, it’s time to add details that will bring your rose to life. Pay attention to the curves of the petals, the veins on the leaves, and the texture of the stem. These small details make a big difference in the overall appearance of your drawing.
Use a sharp pencil to define the edges of the petals and add subtle lines to mimic the natural texture of a rose. You can also experiment with different shading techniques to enhance the realism of your drawing.
How to Add Texture to Your Rose
Texture is what makes a drawing look realistic. To add texture to your rose, try using cross-hatching, stippling, or blending techniques. These methods help create depth and dimension, making your rose look more lifelike.
Shading Techniques to Add Depth
Shading is one of the most important aspects of drawing. It gives your rose depth and makes it pop off the page. Here are a few shading techniques you can try:
- Hatching: Drawing parallel lines to create shading.
- Cross-hatching: Layering lines in different directions for a more complex shading effect.
- Stippling: Using dots to create shading and texture.
Experiment with these techniques to find what works best for your style. Remember, practice is key to mastering shading!
Creating Depth with Light and Shadow
Understanding light and shadow is crucial for adding depth to your drawing. Observe how light interacts with the rose and use that knowledge to enhance your shading. For example, if the light source is coming from the left, the right side of the rose will have shadows.
Common Mistakes Beginners Make and How to Avoid Them
Even the best artists started as beginners, and making mistakes is a natural part of the learning process. Here are some common mistakes to watch out for and how to avoid them:
- Overworking the Drawing: Sometimes less is more. Avoid adding too many details too early in the process.
- Ignoring Proportions: Make sure your rose has the right proportions by starting with basic shapes.
- Forgetting the Background: The background can enhance your drawing, so don’t neglect it.
By being aware of these mistakes, you can improve your skills and create better drawings over time.
Learning from Mistakes
Mistakes are opportunities to learn and grow. Instead of getting discouraged, use them as stepping stones to become a better artist. Every mistake you make brings you one step closer to mastering the art of drawing roses.
Finding Inspiration for Your Rose Art
Art is all about inspiration, and roses are no exception. Look around you for inspiration. Visit gardens, browse art galleries, or even scroll through social media for stunning rose drawings. The more you expose yourself to different styles and techniques, the more ideas you’ll have for your own art.
Don’t be afraid to experiment with different approaches. You might discover a new technique or style that you love.
Where to Find Inspiration
Here are some great places to find inspiration for your rose art:
- Art books and magazines
- Online art communities
- Nature and real-life observations
Practice Tips to Improve Your Skills
Practice is the key to improvement. The more you draw, the better you’ll become. Here are some tips to help you practice effectively:
- Set aside dedicated time each day for drawing.
- Challenge yourself with new techniques and styles.
- Join online art communities to share your work and receive feedback.
Remember, consistency is key. Even if you only have a few minutes a day, use that time to practice and improve your skills.
Tracking Your Progress
Keep a sketchbook to track your progress. Look back at your earlier drawings to see how far you’ve come. It’s incredibly motivating to see your improvement over time, and it’ll keep you inspired to continue practicing.
Wrapping It Up: Your Stunning Rose Drawing Journey
And there you have it, folks! Drawing a stunning and easy rose doesn’t have to be rocket science. With the right tools, techniques, and a bit of practice, you can create a masterpiece that’ll leave everyone in awe.
Remember, art is a journey, not a destination. Keep exploring, experimenting, and most importantly, have fun! And don’t forget to share your stunning rose drawings with the world. Who knows, you might inspire someone else to pick up a pencil and start their own artistic journey.
So, what are you waiting for? Grab your pencil, sketchbook, and let’s create something breathtaking together!
- Telugu Movierulz 2025 Download Your Ultimate Guide To Stream And Download Movies
- New Web Series Palang Tod A Thrilling Dive Into The Supernatural World
Rose Drawing Steps Beginners at Explore collection
Rose Drawing Easy at Explore collection of Rose

Easy Rose Drawing Tutorial at GetDrawings Free download
